I am posting for you an extensive walkthrough of the barebones of what you shall need to do in order to complete your project! For now, on the shooting side on things. I did everything myself so hopefully nothing will malfunction on you (or horribly malfunction for that very same reason.)
Do not consider the below as a final word on the method to accomplishing this assignment, but as a solid guide towards achieving your goal! It is very image based to help clarify what needs to be done. Do keep in mind however that it is ultimately on you come into workshops, keep notes, and do exploring on your own for the most specific details.
Now to begin-
The issue of actually RECORDING VIDEO!
UNR Art Department Media Check-out!
[E-mail Dillion, lab tech. Or see him in person. He is just right next door. We have a system now for check out.]
We have plenty of cameras, tripods, and peripheral equipment ready for checkout! First come first serve basis. Same as the knowledge center.
There will be a form you need to fill out upon checking out equipment, so we know who has which things.
BRING EQUIPMENT BACK WHEN DONE.
UNR Knowledge Center A/V Equipment Checkout
http://knowledgecenter.unr.edu/atone/gear.aspx?equiptype=Video
Check out the multimedia area of the UNR Knowledge Center F1/basement (back of the big @One lab) to check out what they have! Use this link and additional tabs for more stuff (such as audio equipment for checkout) to pinpoint what you want. Some items may require on the spot training but its something you have to deal with. Call ahead of time to make sure it is in stock! And of course, don't bring it in late! They don't like that.
Yourself!
You must have your own device that may be used for disposal for this assignment and the next. Look around. If you feel the need to obtain your own through borrowing or purchase, that's your decision.
Now a brief run through of common methods.
SHOOTING video varies from device to device, though each on its own is very intuitive to harness control of in that aspect. If you feel overwhelmed, do not hesitate to address myself or Dillon.
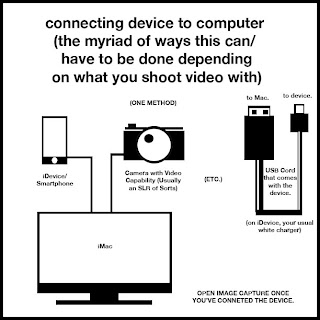
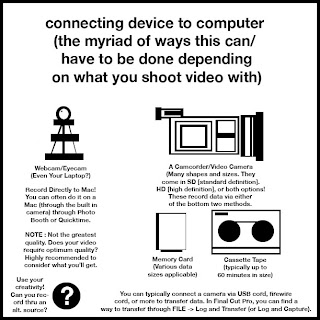
Capturing media also very much varies, but we can begin here visually are it relates to editing the video. I have done two very quick graphics to explain. CLICK TO ENLARGE.
The manner of recording on each device varies
from data on the actual device drive, a memory
card, a cassette, or otherwise. Important to know
what you're dealing with there. Often a breeze.
Find this application if you're importing most
material. Oftentimes you'll have to (per image
caption) with a video camera go through LOG
AND TRANSFER/CAPTURE from the FILE
menu on Final Cut Pro to get off card/cassette.
For a typical iDevice or [video] SLR camera- this.
You'll typically find a screen like this. Select
your device and select the .MOV (or movie file)
you want to import from your device into a
certain folder. In this image, I am importing
that video we shot in class of myself impersonating
Vito Acconci from my iPhone 4S onto the Desktop.
Viola. A brand new video file. Get
ready to import it into Final Cut Pro for use.
More if you have multiple shots.
A master runthrough of the FCP interface.
Beyond this explanation, it should be easier
to intuitively figure out the tools involved.
Start off by importing that video file into FCP!
FILE -> Import -> Files. Sometimes FOLDER
if you have just a ton of files. For now FILES.
We're in the system now. Our file is
in the BROWSER. It can be dragged
down onto the timeline for editing.
Drag and drop. That simple. Top bars above the
equator line are VIDEO and the bottom is VIDEO.
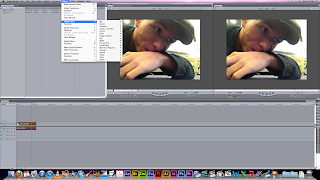
Note how we're looking at Vito/me on the viewer
and canvas. I have the file selected from the browser
and am viewing that on the viewer. However, the
video is on the timeline and the scrubber is over
a part of it so we are viewing it. The reason the base
file is upside down is because I may have shot it
upside down. I fixed it through a tool called "rotate"
within the viewer menu. If you shoot properly like
I didn't, that shouldn't be necessary to do.
What you'll do now (and everytime there
is RED on the video or audio) is SEQUENCE ->
Render Selection -> Both. This is so you
can play video back and actually see what
you are doing.
One problem though : Our video may look nothing
like Vito Acconci effect wise, even though I'm
slouched down and slurring at the camera like him.
Lets browse EFFECTS. It is up to you ultimately
to decipher which of the effects that will benefit you.
Once you have added an effect, it can be modified
through the viewer on its own tab.
This one's a freebee. Look at the image to find
out where Desaturate is. Some of you may be utilizing
this as lots of the UBU videos are black and white.
The reason why both the viewer and canvas are B&W
is that I have double clicked on the video WHILE it is
on the timeline, so now the 'viewer' is looking at that
instead of the video file from the browser (the raw file).
Now its a process of adding more effects. Look
at the viewer side and see how you can modify
effects. It's literally like Photoshop, just as a
video editing exercise. Again, decipher what
effects you'll need for your OWN videos.
Lets look at little more closely at the TOOLBAR.
Say I wanna hack off that unrendered end of my
video because I started too late, rushed the project,
and generally don't care. Look below...
1. Select the blade tool.
Cut on the timeline to
divide video and/or audio!
Tip : Align scrubber to where
you wanna cut for a fine cut.
2. Select move tool again.
Just to see its separate.
3. Have cut off end selected and
then DELETE or COMMAND+X
to get rid of it. Now its gone!
If you're interested in special transitions
between clips and at the ends of clips,
use this! For instance, you can find "CROSS
DISSOLVE" and fade into/from black.
KEYS : I and O are key. When ready to export video,
hit I when scrubber is at beginning of your video to
have an "IN" point. O likewise at the end, as an "OUT" point.
Make sure you're on the timeline when you do this.
FILE -> EXPORT ->
Using Quicktime Conversion
You should get an interface like this.
Don't SAVE (export) quite yet. You need
to go to OPTIONS besides QT Movie.
You'll get to this now. The next three images
will be selecting these in THIS order-
Video : Settings.
Video : Size.
Audio : Settings.
The only things you should change on this
is scrub Quality to BEST.
Video : Size. It varies. We clearly have standard ratio
[4:3] here so export on the left dimensions. If you
have a high quality widescreen, export w/ right settings.
Audio : Best. NOW GO BACK TO
THE FILE SAVE SCREEN AND "SAVE".
That means export. It will export your video!
This may/may not take some time. Depending
on your length.
Congratulations. You have a new video file.
TUTORIAL to be continued with burning
a DVD [e-asy] with your video file later.


No comments:
Post a Comment