Wednesday, November 27, 2013

Exporting Your .DAE

If you haven't jumped to this conclusion already, its simpler than it looks. With a couple of unexpected bumps. Rather than leave any loose ends, I have written this as a guide.

So you want (need) to export your .DAE for me to import into Second Life and install for our final? Follow these simple steps.


We have our example model like so.
We will be using, as we did in class,
Megan's moogle as the test.

Have ready a single object that is
reasonable in scale (can be single or
collage, as the scales have varied)
Make sure what you want to export
is the 'only' thing in your scene.
If there are loose walls far off in
the distance, delete them. Then
go up to 'File'...


...'Export' -> 3D Model. As opposed to
a 2D graphic, which is a JPEG.


Standard protocol thus far. Just give it
a name, location, and make sure you are export-
ing a .dae (Collada) instead of Google Earth
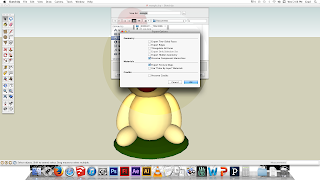
document. Not over yet. Click 'Options'.


Have checked ONLY these two boxes. If I am
not mistaken, 'triangulate all faces' will also be
selected for the .dae export. Uncheck it. We want
our models in Second Life to be a reasonable
poly count so 'parts' do go missing upon import.
Plus, you may achieve a pleasing 'polygonal' fx.
Hit OK. Export. Move on.


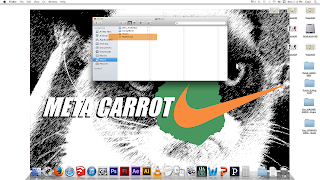
 Find your file where you exported the .dae.
I picked 'Music' because its clean and
hardly anything goes in there project wise.
Select it. And hit 'space' if you are using a Mac...


To be able to actually preview it in 3D!
This little add-on is probably a specific
OSX exclusive, so don't be disappointed
if your have Snow Leopard (-) and it does
not let you. Also, PC may be different as well.


Another angle.


But lastly, right click the item in your finder or
PC equivalent, and compress it to a .ZIP
folder. On PC, you should be able to 'send'
the .dae to a compressed .ZIP folder, all the same.


Final step : email that .ZIP to me
sometime before the Dec 3 date.
The reason it needs to be in this
folder is that the file does not even
work if sent through email as a raw
.DAE. Needs to be protected in
this manner. Will not work/accept
it if otherwise.


And the still in class we looked at of
a couple different second life imports
in action. The optimized one we can
view in full (right) and the one of the
right with many polys and missing
an eye and other elements.
Just be concerned with unchecking
the 'triangulate all faces' box on
export, and you'll be fine. The
rest should be on my end.

That's it in a nutshell.
Will not take you more
than 5 minutes, at latest,
if done right.

Ben.

.

Sunday, November 3, 2013

Project 7 + Final : A Digital You (Virtual Reality)

  F I N A L   D U E   D A T E   R E M I N D E R S


Project 6 : November 19
Essays, Groups ABC : Nov 7, 14, and 21
.dae File of Project 6 : December 3
Event Write-Ups and Extra Credit 3D Print : December 5
Project 7 and Final Meeting : December 10 


A S S I G N M E N T   7  +  F I N A L

"A Digital You"

* Digital, avatar representations of yourself.
* Performance art in a virtual setting. i.e. Machinima

 Machinima (n.) : The use of real-time computer graphics engines to create a cinematic production. Most often, video games are used to generate the computer animation. Machinima-based artists, sometimes called machinimists or machinimators, are often fan laborers, by virtue of their re-use of copyrighted materials.


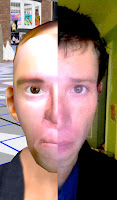
Splices of Second Life avatars and real life counterparts.
Supermen/Catwomen and Clark Kents/Selina Kyles, respectively.


And a worthwhile example of an existing Machinima using
a 3D, virtual interface. 'American Beauty x The Sims'.


In a NUTSHELL... Before going on... This assignment will see you interact with the immersive, 3D world Second Life in direct ways-


1.) Opening up Second Life (in lab or @One DML) create an account. Free!

2.) Change an existing template to match your own appearance! PHASE ONE.

3.) Save that outfit. Change appearance of that to become a 'fantasy' self. PHASE TWO.

4.) The date-time of our FINALS  meeting (DECEMBER 10, classtime, 1PM sharp) we will meet in Second Life to have a reception for our own virtual reality art installation using on Project 6s. You will have given me a .dae export form SketchUp, hopefully with materials still attached glitches abiding, so I can have them ready for install. Yes, that is right : The final in the digital class will meet in the actual digital world.


By December 10, the "turn in".


1.) Both of your avatars (real you, fantasy you) documented 
in photo form (minimum [2] screencaps for each)
and posted to your blog. And a brief statement of
how your fantasy self relates to your real self.
Do not forget this step.

For our final meeting, have ready the "real self." Part ways
through we will transform into the "fantasy self".

2.) You will have sent a friend request to my avatar.
I will of course say 'yes'. This is how I can
teleport you to my location for our 'meeting',
 which will be an open sandbox where we
can build items. Such as... an art gallery.
My avatar name : DeBender of the Universe.

3.) When the whole class is together on Dec 10,
thru voice chat/text chat/and gestures, we'll take
a tour through a gallery we will have modeled together
'critiquing' our Project 6 object models in a new format. As if
they were sculptural objects, i.e. Warhol's soup can.
The objects may be scaled to any degree.
They can be 'photo framed' as well if errors persist.
And other activities we can come up with!
And of course, we can compliment each others' Proj 7s.


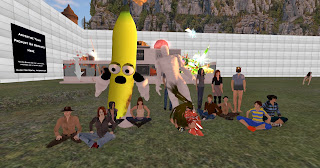
Images for reference of a previous
"vr show". "Eye of Machine". How each
artist envisioned a self portrait of themselves
through the eye of a machine.


 WORKSHOPS

Sundays : 1-4.
From me, leading up to final. 
And class time following each
of the essay presentation days.
If at all you might feel overwhelmed,
please come for assistance.


Part 1: First Self


Representational Avatar/Self
Sign up for a free account and get acquainted with Second Life. Go to http://secondlife.com/ and sign up! Your first steps are to create a representational avatar/self portrait in the online community “Second Life”. If your computer allows it (more than likely yes) you are free to download the program for yourself. Test that out excessively. Keep in mind 'the final'.


Follow these steps:
A) Start by changing your appearance functions to essentially create a self portrait in appearance and body shape as avatar. Either create or find clothing items that work for your self-portrait/avatar. Think of the tools available as a new type of drawing system – using this system to create the most realistic, representational depiction of the self.


Examples A1 and B1. (See below.)


Follow this tutorial. You'll learn a lot by 'doing', but this helps additionally.
http://wiki.secondlife.com/wiki/Appearance_Editor


B) Once you have created an avatar (or you have one that your previously created as a mirrored self, great!), save this as an outfit. If you desire, you may work with the skin template in photoshop to create a more realistic representation of your face and head.


Follow the link below. You can download a template (Photoshop

file - layered) to stretch out a front and side portrait on to

map your own face into the Second Life world engine!


These are links for the head template to import. 


 http://www.robinwood.com/Catalog/Technical/SL-Tuts/SLPages/AVUVTemplates.html
http://www.robinwood.com/Catalog/Technical/SL-Tuts/SLDownloads/UVMaps/SL-Avatar-Head-1024.jpg


If you go to the top link, just scroll down to  1024x1024 and get 'Head'. 

WHEN YOU IMPORT IMAGE INTO SL, IMAGE MUST BE 512x512. Resize after mapping 1024x1024.


This is a tutorial on making and importing skin. In a nutshell, simply enter at the top BUILD -> IMPORT -> IMAGE. It will only let you do so for 10 L (dollars in game). Using the lab fees available, I will ensure you receive a good amount of money from the Digital Lab (from myself and Joe DeLappe) to spend on importing images to map your face with. May take more than one try. After you've imported, you can simply enter the edit appearance mode, body -> skin -> face and use image.

The face mapping is an optional quest, though I will take it into notice if your avatar looks absolutely nothing like you. Face mapping is an assured way to clinch a representation of yourself.
 
 
http://www.avatars-3d.com/tutorial-template-secondlife/273-second-life-how-to-use-a-skin-template


Part 2 – Second Self


For the second part of this project, create a new avatar/self-portrait that explores the variety of possibilities available in second life to fabricate a completely imagined, new self. Be creative – consider issues of gender, skin color, explore obtaining new clothing items, etc. There are plenty of clothing options to be 'shopped for' on the online Second Life store, using your given SL dollars from our lab.


Examples A2 and B2. (See above, again.)


The sky is the limit with this imagined self as avatar.  Are you a superhero?  Want to be a movie star?  7 feet tall?  

 
Amidst a lot of talk about art theory, we can't forget the biggest tool of all : imagination.


My example real self. Benjamin Poynter. 25. From Oklahoma

City. Digital artist, indie game dev, MFA and instructor.


My example fantasy self. DeBender of the Universe. 34.

From Parts Unknown. Intergalactic Grappling Champion.
Master of the Busaiku Knee Kick. Speaker of the house.

Interstellar Political Activist. Fashion Icon. Gardener.


Final meeting protocol will be discussed in a later
class leading up to the final meeting. What our gallery
will even look like, a methodology to how we install
in the space, conceptualizing a title/theme (Meta Carrot?)
and more. This will coincide with further
demonstration of the Second Life world.

And of course, I will be taking stills/video capture
of our meeting to immortalize in machinima form.

.


.